Showing posts with label solids. Show all posts

Saturday, February 18, 2017

My Wide Open Spaces Quilt in McCall's Quick Quilts April/May 2017

I am so excited to share my most recent published quilt pattern!  It is in the April/May 2017 issue of McCall's Quick Quilts and it's called Wide Open Spaces.

This pattern is modeled after those vintage chenille bedspreads, where the pattern was along the outside border and the center was empty.  I thought it would look beautiful hanging over the sides of a twin bed.  It's an extra long twin, with the finished size measuring 70"x 90.5".   If you look closely at this picture, you can see the beautiful quilting done by Laura McCormick of Always Keep Quilting.

I used some prints from BariJ's Joie de Vivre line and lots of Art Gallery Pure Elements Solids.

You can purchase just the single downloadable PDF pattern here:

http://www.mccallsquilting.com/quickquilts/articles/Wide-Open-Spaces-Quick-Colorful-Quilt-Patternhttp://www.mccallsquilting.com/quickquilts/articles/Wide-Open-Spaces-Quick-Colorful-Quilt-Pattern


One of my favorite parts of having my quilts in magazines is the artsy photos they do to show off the quilt.


If you'd like to buy just the one issue, you can do that using the link below:

http://www.mccallsquilting.com/quickquilts/issues/Quick-Quilts-April-May-2017 


SaveSaveSaveSave

Wednesday, February 1, 2017

Blithe Fabrics Blog Tour - You don't know what you don't know!

Diamonds quilt with a scrappy binding
When Katarina Roccella posted on Instagram that she was looking for entries for a blog tour for her new fabric line, Blithe, with Art Gallery Fabrics, I got right to work designing a pattern.  I adore Art Gallery Fabrics for their rich color and wonderful hand.  They wash like a dream.  Not to mention that if you got chosen, Art Gallery would send you fabrics to make your project with!

I was so excited when my entry got chosen.  When the fabrics came, I got right to work cutting....

One thing I really love about finished quilt photos...you can take them artistically and keep your eyes off of the flaws.  Pretty much every quilter I know always points out all of the flaws and imperfections in their work.  Some imperfections are more than that though, they're straight up mistakes.

Quilt Back with leftover scraps from the front
This is my first sketch, I did two more after this, with colors and more precision and measurements.  But this is how I always start out.  In my head (sadly), half square rectangles were the same as half square triangles.  Yeah.  I know. DUH.


This is how all of my quilt patterns start out - messy and on graph paper

So I start to sew all of my ALREADY CUT fabrics and this is what I get...no points.  I thought, maybe it's my imprecise sewing.  Some of them look 'sort of' like points.  Sort of.

YIKES!! Where are the points??
Then I do what everyone does.  I Google "half square rectangle" and watch some You-Tube videos.  As my Nonni used to say, PAIN IN A BUCKET.  There were all of these wonderful videos and tutorials about how not to screw up your half square rectangles...like this...

From Heidi of Buttons and Butterflies
http://www.buttonsandbutterflies.com/2015/09/half-rectangle-triangles-tutorial.html

or this one, from the Modern Quilt Guild
https://themodernquiltguild.wordpress.com/2012/01/08/100-days-week-of-shapes-tutorial/


No points here either
So, now I know what I didn't know.  But I didn't then.  So this is what my quilt came out like.  Of course, I had to finish it, it was an honor to have my design chosen.   Too bad my execution wasn't as good as the original design!!


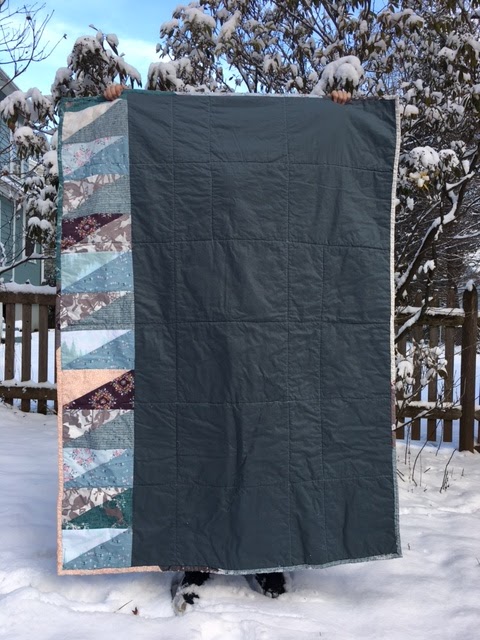
From far away, in the fresh snow, it's pretty.  Just squint.
 My daughter held this up outside in our back yard after the snow, and it looks wonderful in this light.  She's already claimed it.  She has no idea that there are supposed to be nice, sharp points on all of those triangles.  Thank goodness she doesn't care.

Photo cred to my daughter Ally for holding this up so I could get good pictures
I do love the back, and the scrappy binding I made with all of the left overs from my super-over-zealous cutting for the front.

If you have other tutorials, or wisdom about half square rectangles (or anything else that I don't know that I don't know), I'm all ears!
SaveSave

Wednesday, April 13, 2016

My Guest Tutorial on Sew Mama Sew - Little Boy Blue Baby Quilt! + GIVEAWAY!

Here is my secret sewing project from the last 2 weeks!  I did a guest tutorial for Sew Mama Sew and you can find it here:


Finished baby quilt is 33/5" x 38.5"


I love all of the amazing content and inspiration available on Sew Mama Sew.  Hop on over and check it out!

To celebrate, I am having a giveaway!  Just leave a comment below, saying that you've signed up to follow my blog here, or my Instagram feed at "restitcherator".

The giveaway is for a gorgeous Denyse Schmidt Charm Pack in her Hadley line, and a spool of variegated Aurifil thread!


A random winner will be chosen on April 22nd!  Good luck!!

Sunday, February 1, 2015

More Economy Blocks - I heart scraps

As I try to fill up the last minutes before the Super Bowl starts, it occurred to me that I had more Economy Blocks to share.  I think I have around 20 in total.  Lots of them include some of my favorite tiny Heather Ross scraps, like the horses and tack from her West Hill line in the first one.  I tried stripes, trying to see what it would look like...maybe a bit too busy for me?

Heather Ross West Hill horses

This van and the pink on the outside are both Heather Ross too...from the tiniest bits I had saved.


I think these people are running for the ice cream truck.  I definitely like the look of the solids along with a print...three prints might be too much.


A beautiful mermaid...this one was an attempt to see about not "exactly" solids, just fabrics that had lots of solid space or a tonal pattern.


As you can see, I was all over the place, trying different combinations to see what I liked best.

What does the fox say?
A bicycle that my fussy cutting was...um.."off" on.  But I was not about to throw it out.


I will admit, I do like how scrappy they look altogether.  I'm still wondering if a whole quilt would just be too much.


Do you like the solids?  Stripes?  Or all of the craziness of 3 patterns?

Saturday, January 3, 2015

Aviatrix Medallion QAL - Progress is Amazing!


I loved this pattern from the moment I laid eyes on it.  The rainbow color spoke to the 80"s child in me and said "you NEED to make this rainbow quilt".  When I saw that they had a kit and Quilt-a-long at my local quilt shop (Sew Inspired in Simsbury, CT) I went and bought one right away.  It's just piecing I told myself...yeah, a LOT of piecing, but I can do that.  Maybe. Not so much.

UGH.  Thank GOD for the first class...The instructor went over the cutting for the center piece in great detail, noting that although you got a fat quarter for each color, which is what the pattern called for, you needed a FULL, EXACT fat quarter.  If it was a hair short or crooked, you had to get clever with your cutting.

I tried to take a lot of pictures as I went along.  The diamonds were much harder to line up than I thought...and every single one of the eight had to be ripped out at least once.  I used the templates in the pattern.  My cutting techniques and precision need improvement.

My not so exact diamonds for the center medallion

Much pulling and creative pressing ensued.


The first set of grey offsets helped a ton in "making" things straight
 This project has been a lesson in patience.  And also, in taming my perfectionist shrew.  I only tore the center out once, and I am honestly really happy with how the points came together in the very center.

Look at my points in the center!
I absolutely love the grey fabric that was included in my kit. It's got this amazing texture, it's not a quilting cotton.  I'll have to ask exactly what it is next time I'm at the shop.


Center and border #1
It was so much fun to put the first colored border on.  It really started to feel like the rainbow explosion I was looking for.

Border #2
Although the fourth border was a great deal of piecing, it was also sort of addictive.  I wanted to actually see the blocks finished, and I was chain piecing a lot of it, so I didn't get to see what they looked like until the end of the month.

With Border #3, which was a TON of piecing
As my Aunt Pat says, "the pattern is beginning to emerge".    It's so big now, I have to take it outside to get good pictures.  It was very grey the day I took these.

With the squares for border #5
This is a close up of the grey ("neutral") squares for Border #5.  When you sew them on, they're rectangles, and I was sort of surprised they actually came out like the pattern said they would.

Close up of Border #5
I went to the class today as a drop in.  They went over the next two borders.  The final border set is the butterflies, which will challenge my ability to do angles again.  They are also TONS of piecing, wish me luck in keeping up!

At the end, I'll try to include some pictures of the other color/fabric options people in class chose.  They are all spectacular.

Wednesday, July 23, 2014

Loft queen size quilt - finally finished, and I LOVE it

I bought the fabric for this quilt a year ago in February.  It was my first attempt at picking out all solids for a quilt.  Even with that, you can see a bit, that the grey is a marble and the light blue does have a tiny pattern on it.  The pattern is called "Loft" from Quilts Made Modern by Weeks Ringle and Bill Kerr.    I chose the book because it had a lot of description about colors, and choosing colors, and how your choices effect the final overall look of the pattern.

Here it is, mid-July a year later.  I absolutely LOVE how it came out. It will be for our guest room and I am looking forward to someone using it!


"Loft" - my first "modern" quilt

My Aunt Tala did the quilting.  It came out AMAZING.  One of the goals for the quilt was for it not to look too "girly".  I love that the quilting matches the more modern style piecing.  Of course, if you look closely, you can see that my rows are not perfectly aligned, but overall, I'm very happy with how the alignment worked.  The rows were LONG and a few of them were hard to make line up well.


Quilting by Tala

The back I made from two of the bolts that I got when our local JoAnn moved to a new location and had super clearance prices if you took the whole bolt.  I only bought six, which I think showed tremendous restraint.


Here is a close-up of the two backing fabrics...both dots.  I love polka dots.


This quilt, although it took me well over a year to finish, has really inspired me to work more with solids.  Which do you prefer?  Solids or prints?


Sunday, March 24, 2013

Fat Quarter Shop Mystery Designer BOM #10

Can you believe it?  Ten months have gone by ALREADY?  How does this happen, the time flying by like that?  It is really fun to look back at the blocks as I add each new month to the pile.  Some I remember because of what else was going on in my life at the time.  Some for what the weather was like.  Some because I screwed them up and had to un-sew or completely re-cut parts.  A really nice way to mark the passing of a year.

This month's block is by Minick and Simpson called "Sunday Drive".  It uses this fabulous red houndstooth fabric that I LOVE.


I can also very clearly notice my improvement in technique as the months go by too.  I'm happy with my points, and how everything lines up, and most of all, that after a very tiny trim, I actually have a 12.5" square!

I've already started cutting my next big project.  It's a quilt for our new guest room from Quilts Made Modern by Weeks Ringle & Bill Kerr.  My first solids quilt.  I can't wait to show you all some progress.