Saturday, April 30, 2011

My Pfaff and Me

In the online sewing community of late there has been a high degree of finger pointing and nastiness. Sadly, I clicked on a link to a blog post that had dozens and dozens of comments about what people DIDN'T like. In between all of those nasty comments there were a few positive ones, and a few of them said they would like to know what kinds of machines people sew on, if they liked them, and why.

As I always do, I'm trying to stick to the positive only, so I decided to take a few pics, and share my baby with you all.

A little over three years ago I got back into sewing. About a year after I started, I realized that my machine simply could not do a zigzag. It was a 1950's Kenmore that was a handmedown. I had it serviced and it still didn't work, so I decided to buy a new machine. It was spring, and I had tax refund money burning a hole in my purse. I read everything I could find on the various brands and styles of machines. Then I stumbled across Pattern Review.com. It's an amazing resource, with an active community of posters. I read reviews like crazy. A LOT of reviews. And then I stumbled across a review by someone I KNEW (sort of). Ann from Gorgeous Fabrics.com online fabric store and Gorgeous Fabrics blog. She sewed on a Pfaff, and that was all I needed to hear.

I searched for all of the Pfaff dealers in Connecticut, but ended up finding one just over the border in Massachusetts. When I called, they said, lucky me, they were having a sale because the new models were coming out (music to my ears!). I chose a Pfaff Expression 3.0. It was the middle of that line, and it had ALL of the features I was looking for. I paid $1999 for it, and I had a coupon from the Pfaff website for a free Fab-u-motion attachment. GREAT DEAL.

Going from my old machine to this was like going from a bike to a Ferrari in one shot.


I got free lessons from the store, and took only one. I brought the machine home and just dove in. As you can see from the panel, there are a lot of stitches.


THE selling point to me on this line was the IDT technology. If you look you can see a black arm that comes down right behind the needle. It feeds the fabric evenly through the machine, and makes all the difference in the world to me in making the quality of my sewing more even and precise.


This is a picture with the front piece taken off. Inside this piece are the holders for the feet, bobbins, and mechanical stuff at the back (screwdriver, brush, and buttonhole attachment). When it's off, you can maneuver around sleeves or small cylindrical pieces, like for a purse or bag.

The opening to the right is really big compared to other machines. I have only quilted three things on this machine, but they fit very easily and nicely into this space without bunching.


I still don't know 1/2 of what this machine does. But I love sewing on it, and it's easy to use. It has all of the features I wanted, including the ability to program in favorite stitches. I expect to sew on this for a very, very long time.
Friday, April 15, 2011

Joel Dewberry's Sewn Spaces Yoga Mat Bag - Pattern/Book Review

So, if you follow me on Twitter, you know I've been going to Bikram Yoga classes. I've gone enough that I thought it was time to make myself a bag to carry my mat. Not just for going to class, but also for at home. Instead of being propped up in the corner, I can actually hang my mat up now.

I just happened to be trying to organize my HUGE collection of sewing books and I noticed a pattern for a yoga mat bag in Joel Dewberry's book Sewn Spaces. The pattern looked pretty straightforward, but I liked the use of multiple fabrics, so away I went.


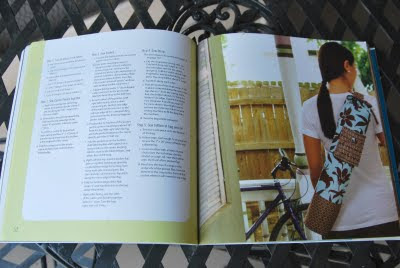
This is pretty much the amount of detail that is shown on any of the projects in the book. It's sub title is "fresh and modern fabric projects for your life and home". Most of projects are home goods with a few other things thrown in. There are cards, a teddy bear, and some great patterns for chair pads and the like.


I chose to use some of my Anna Maria Horner Innocent Crush not just because I love the prints, but also because they're darker and I thought they wouldn't get dirty so quickly.


As I started to assemble the bag, I realized pretty quickly that the directions were pretty brief. I learned a long time ago to READ THE WHOLE SET OF DIRECTIONS BEFORE STARTING THE PATTERN. I must have read through pretty quickly, foolishly "ass"uming that it was an "easy" pattern and I didn't need to look too hard. I was mistaken.

For the LIFE of me, I couldn't figure out how to make the drawstring casing so that it wasn't closed shut. The pattern referenced an earlier project in the book to make the drawstring itself, which I also read too quickly. If I had looked more closely, it talked about using buttonholes as an entry/exit point for the drawstring. But to be truthful, after re-reading it multiple times, it still wasn't clear in terms of order of steps to get the buttonhole made, and not sew the layers together. I had to rip it out not once but twice. I'm really glad the bag is for me, because the top is sort of uneven and stretched looking.


I am quite happy with the way the bag came out overall. I love the look, the mat actually fits in the bag the way it looks in the book, and now that I've made it (it took about 3 hours total), I could easily make it again in half the time. The pocket was a little bit tricky, but not too bad. I don't have a button cover maker yet, so I still have that to do, to add a button to the pocket.


Notes about the book and pattern...first and foremost, I LOVE Joel Dewberry's fabrics. I love his color choices, and aesthetic. I love the projects in the book. The choice of projects is great, and the photography is very pleasing. That having been said, you would actually have to read the whole book, or make the projects in order (which I NEVER do) to understand all of the directions easily. The patterns are not written for beginners, I don't think. There are very, very few pictures of how to lay things out or what things look like as you're sewing. That's one thing I really utilize in a lot of patterns I make. The illustrations and drawings. Finally, I think for just a few more sentences, which would easily fit onto the page, the directions would be much more clear.

I also got a gorgeous spring day to take pictures, so I took them all outside. I couldn't take an action shot of myself with the bag. Maybe on Sunday when I go back to class I'll have my husband take a picture of me.

Sunday, April 10, 2011

Catching up - Starry Night BOM x 2

So as part of my unintentional hiatus in March, I didn't do my BOM projects. I had both March and April's blocks to do, so I got right to work this weekend. I actually did these two blocks simultaneously, so it felt like I was getting a lot done in short time.

Here is one...


I wasn't thrilled with my points on this one. For some reason, I find that this black is a bit slippery, and that it's really hard to make super straight 1/4" seams.

This is the other (April's Block) and I think that because it's more of the two main colors, I was really able to get my seams nice and straight, and my points nice and sharp. What do you think??


Here are the two of them together. I should maybe take another photo of the 10 I have done so far. Only May and June and I'll have all of the main blocks done.


I need to make 13 of the filler blocks, and I've only done 2 so far.

In other news...my daughter DID NOT like the laminate I chose for her raincoat, so I'll have to find another use for that great polka dot. In the meantime I'm going to take what was to have been the lining and make her a dress.

Do you have any projects that use laminate that you love? What are they? I need to find a use for this great dot.

Sunday, April 3, 2011

March - In like a lion, out like a lamb.

It was a loooonggg month of March at my house. I had two kids with strep throat, and ended up sick myself. Sicker than I can remember being for an awfully long time. The germs have passed, along with the ending of Daylight Savings Time, and I am really ready for spring to kick in.

I did quite a bit of sewing at the beginning of the month, and just finally finished the top to a baby quilt for some friends on Sunday. It's another "thanks to Twitter" project. The pattern designer, Rachel Griffith, tweeted about her new pattern, "Flipside" being available at Fat Quarter Shop. When I saw it, I knew I had to make it for someone. Anyone. So I ordered the pattern right away. Just so happened, that I also saw a tweet (or a newsletter) from Above All Fabric saying that Kate Spain's Central Park was available. Just what the pattern called for! Much internet shopping ensued.

I didn't read the pattern carefully enough, and I just started cutting as soon as the fabric came. I ended up making the larger size (not the crib size) of the quilt, which was 4 blocks by 4 blocks. I decided to keep it that size, I'd always rather have a quilt a little big than too small. Don't you think??

Here is the finished top. Which I LOVE. Funny though, when I finished my blocks, I was so proud...they all measured around 12 1/4" and I thought "look at me! I'm finally not making those wide seam allowances anymore. I can just trim them all to the perfect 12" size, isn't this GREAT". So trim away I did. Then I re-read the directions to find that the blocks were supposed to be 12 1/2"!! So, I had to trim my sashing and center squares to fit. But everything is nice and square now!!


After my "adjustments", I'm very pleased with how my sashing lined up.


On a more personal note the best part of March, by far, was my first "vacation" with my husband since our honeymoon almost 3 years ago. We went to Vail, Colorado to ski for 3 days. I had only ever skied in the "east" and was absolutely blown away by the breathtaking Rocky Mountains. My husband is a photographer AND a skier, so he was in his glory for this trip...


This was the first year I would actually call myself a legitimate skier. I'd been skiing before, a handful of times, but I went around 20 times this year with all of the record breaking snow that we got, and my skiing improved dramatically. I was actually able to ski this...which is part of the China Bowl on the back side of the mountain at Vail. It was SO much fun and I was really proud of myself.


We had an absolutely fantastic trip. Best of all, I'm actually looking FORWARD to next winter, which I never imagined I would say. The weather was perfect, and we came home to happy kids. You can't ask for anything more than that!


Hopefully, I can hop back on the blogging bandwagon. Up next, I'm going to start on a raincoat for my daughter with Amy Butler's Little Splashes pattern.