Showing posts with label children. Show all posts

Sunday, May 13, 2012

Thankful to be a Mom

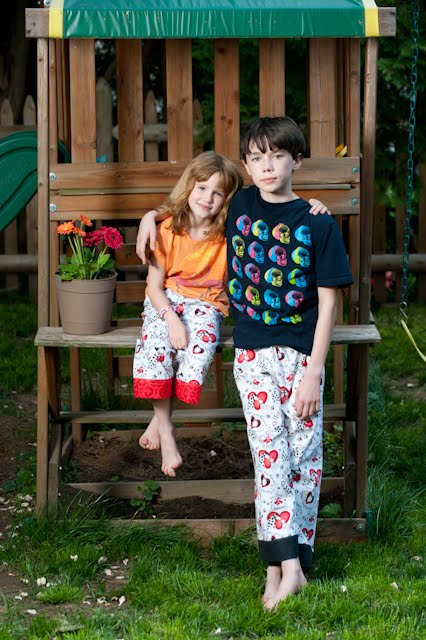
When I see them like this, sometimes I think to myself "Am I really their mother?? Did I manage to care for them and love them bring them to this point?" I am so blessed with such healthy, happy, fun, kind children.

So for Mother's Day, I made THEM gifts. Matching PJs from the great Scientific Seamstress pattern for Easy Fit Pants. The fabric was from *gasp* Joann, and was not designer per se. But it reminded me so much of them. It says "Did you kiss your dog today?". They both love our dogs to death.


The long and short of it is I had a wonderful Mother's Day. I am so fortunate to have these amazing little creatures in my life.

Tuesday, March 27, 2012

Child's Artist Beret - First Published Tutorial (PDF)!

I have no idea why these things take me so long. I originally made these berets when my daughter was in kindergarten and doing a unit on Master Artists. She's finishing second grade now. Sheesh. Ally is in the front kneeling row all the way to the left with the turquoise top.


I made 25 of these berets in primary colors, so all of her classmates could "feel" like Master Artists as they reproduced various artists' styles. I was told the kids LOVED them and were sad to have to give them back to the teacher at the end of the segment so the next year's class could use them.

I've put the directions into a single page, PDF format, so you can print it out and make berets for your own little artists. Click on the underlined link to print it out. The image below is so you have an idea of what it should look like.

Child's Beret Tutorial


Please, please if you make them, send photos to me and I'll share them here!!

Friday, October 14, 2011

Child's Artist Beret Tutorial PDF

So, what's it been, a year?? And I finally found the time to learn how to make my tutorial into a PDF and make it linkable to my blog. Feeling very proud of myself actually!

So here is where you can find the one page version PDF.

And here's my daughter wearing her beret. She says it makes her feel very artistic!

Tuesday, January 4, 2011

Edith Twirl Skirt - Pattern Review and Pictures

I know, I know...it's been weeks since my last blog post. I have been working on a number of great projects, but the prospect of taking things out in the frigid cold to take decent pictures has not been very enticing...throw in the holidays, a snowstorm and well, you get the idea.

I wanted to get started again with a BANG, so I want to share my review of a pattern by the crazy talented Jona G. of Fabritopia. She has her own line of sewing patterns out, and I was fortunate enough to have her as one of my roommates at Quiltmarket in Houston in October.

The pattern I made up was her Edith Twirl Skirt. It comes with sizing for 2-10 and two different styles. I made a size 5 in View A, the one with only single fabric for the main skirt body (shown on the left in the pattern cover).


There are a few things that I LOVED about this pattern. First and foremost, there are no pattern pieces!! The pieces are all rectangles or strips cut the width of the fabric. What that means is that I can use this pattern over and over again, in different sizes WITHOUT TRACING. Can you say Hallelujah?? It also meant that it was quick to prepare, and I got right to the sewing.

The second thing that I loved, is that the paper it's printed on is very sturdy, and it's a single fold out page, two sided. WHAT did that just say??? No crazy pages to fold and try to re-order? That's right! Just follow, and flip. Again, simplicity is often genius.

The pictures that Jona included are also very clear. I did have to pull out and re-pin one part. Thankfully I had not sewn yet, and I realized by looking at the shading on the pieces that I had them placed incorrect sides together. The directions were clearly written, and the graphics were very helpful.


I bought a number of pieces of Anna Maria Horner's Innocent Crush after I saw it at Quiltmarket in October. It is just GORGEOUS and the fabric quality is outstanding. My daughter Ally chose three of the patterns and told me exactly where to use each of them. The result was just adorable. No pictures actually on Ally yet, but they will come.


I will say, that is a whole lotta' skirt for a tiny girl. My daughter is only about 37 pounds at 6 years old, so she's a Skinny Minny. But she loves the volume.

Other things I would note about the Edith pattern...

There is some serious gathering to be done with this pattern. If you are not comfortable with gathering techniques, this might not be the first one I would try. I thought I actually enjoyed making ruffles and gathering. That was until it took me three tries to get the gathers for the skirt lining to match up with the outside skirt panel. The results, though, once I got it, look adorable. My only comment would be this is not necessarily a beginners pattern.

And then, there was the snow...


On another note...we got that big blizzard the day after Christmas that the rest of the Northeast (and some of the SOUTHeast) got. We ended up with maybe 12-14" at our house. Ally LOVED it. The dog, not so much.


Here's my fun girl doing one of her favorite things to do in the snow...make snow angels. And boy, is she good at it!


What did you do over Christmas vacation??

Friday, December 3, 2010

My First Tutorial! Child's Artist Beret

Wow, I don't know about you, but this is pretty exciting for me. This is my first tutorial on this blog. I'm going to show it as a post here, but I've also made it into a PDF. It may take some wrangling for me to figure out how to add that...but it's done and just a matter of getting it to work.

I blogged about making 25 of these last winter for my daughter's kindergarten class. They were doing a unit on "Fine Art", so to get themselves in the mood to work like artists, they each wore a beret, like Vincent Van Gogh, or, if you prefer, Fancy Nancy. When the teacher asked me to make them, she gave me a photocopied sheet of someone's hand written directions. Immediately I thought I should do a tutorial, and here we are, a good 7 months later. All in good time.


Please, please, share any comments or suggestions you have if you make any of these. Without further ado...


Child’s Beret – A la Fancy Nancy or Van Gogh, or whomever your favorite artist might be

Materials:
18” square piece of craft felt
2 yards of double fold bias tape
2 ½ yards of ¼” elastic
Coordinating thread

Steps:

1. Cut an 18” diameter circle from your felt

2. Pin the bias tape, open side towards the cut felt edge ¼” from the edge. Do not overlap the ends of the bias tape, but put the two cut edges as close together as you can. (See Image A) The closer you’re able to get them, while not overlapping, the better the beret will sit evenly and the more “round” looking it will appear.


3. Stitch along the open edge of the bias tape, as close as you can to the edge, ensuring that you stitch through both layers. I suggest pinning a lot. This seems to help keep the layers from slipping apart, which the bias tape seems to do when you’re not looking!

4. Make sure you leave enough room in the “pocket” of the bias tape to slide the elastic through.

5. Put a safety pin through the end of the elastic to make it easier to pull through your “pocket” of bias tape. Start at one end of the opening, and slide the elastic through, all the way around your beret. Try to keep it as flat as possible as you do this, it will help to make the beret sit flatter on your child’s head.

6. Pull the ends of the elastic together to tighten the circle up and create your beret. Use your child’s head as a guide for how large or small you need the hat to be. Knot both ends of the elastic, but DO NOT CUT IT.

7. You can knot the two pieces together and tuck them up inside the beret to keep the size steady. The reason for not cutting is that you can adjust the size as your child grows.

8. Make a tiny slit (and I mean tiny!) at the very center of the beret. You can use yarn, ribbon, or rickrack folded in half to make a loop. Once your loop is folded in half, push the folded end through the slit in the center of the beret. You can either knot them together, or make 3-4 stitches to hold it in place. (Image B)


9. Voila! You have a fancy beret to inspire your little artist to make wonderful creations. (Image C)


So run, run to make your kids some berets so they can make you some FINE refrigerator art.